1. How to Create OTBI Reports in Oracle Fusion
In this article we will learn to create Oracle Fusion(Cloud) OTBI report step by step without going too much in technical details so that you do not get distracted by over usages of jargon and leave the article halfway. We all know that Oracle provides several ways of reporting data from Oracle Cloud (Fusion) Application, OTBI is one of them. It is also know as Oracle Transactional Business Intelligence (OTBI). There are many prebuilt reports and dashboards that you can directly run using OTBI. Along the way, I will also tell how to run those delivered reports and dashboards. Lets first learn how to access OTBI.
2. Roles and Access Needed to Run or Create OTBI Reports
If you just want to run any report, oracle’s seeded Employee Abstract role is enough. But if you want to create any custom report you will need to have BI Administrator Role. Problem with this role is that it doesn’t work straight forward. Even if you assign this role directly to you, you won’t be able to create any reports. First you will have to create a Custom BI Admin Role and assign the Seeded BI Administrator Role to it.
If in your instance, you are able to create report without any problem, you can skip this part and directly jump to section “3. Business Requirement to create OTBI report” or else just follow to see how can you create a custom role first to be able to create report.
2.1. Create custom Custom BI Admin Role
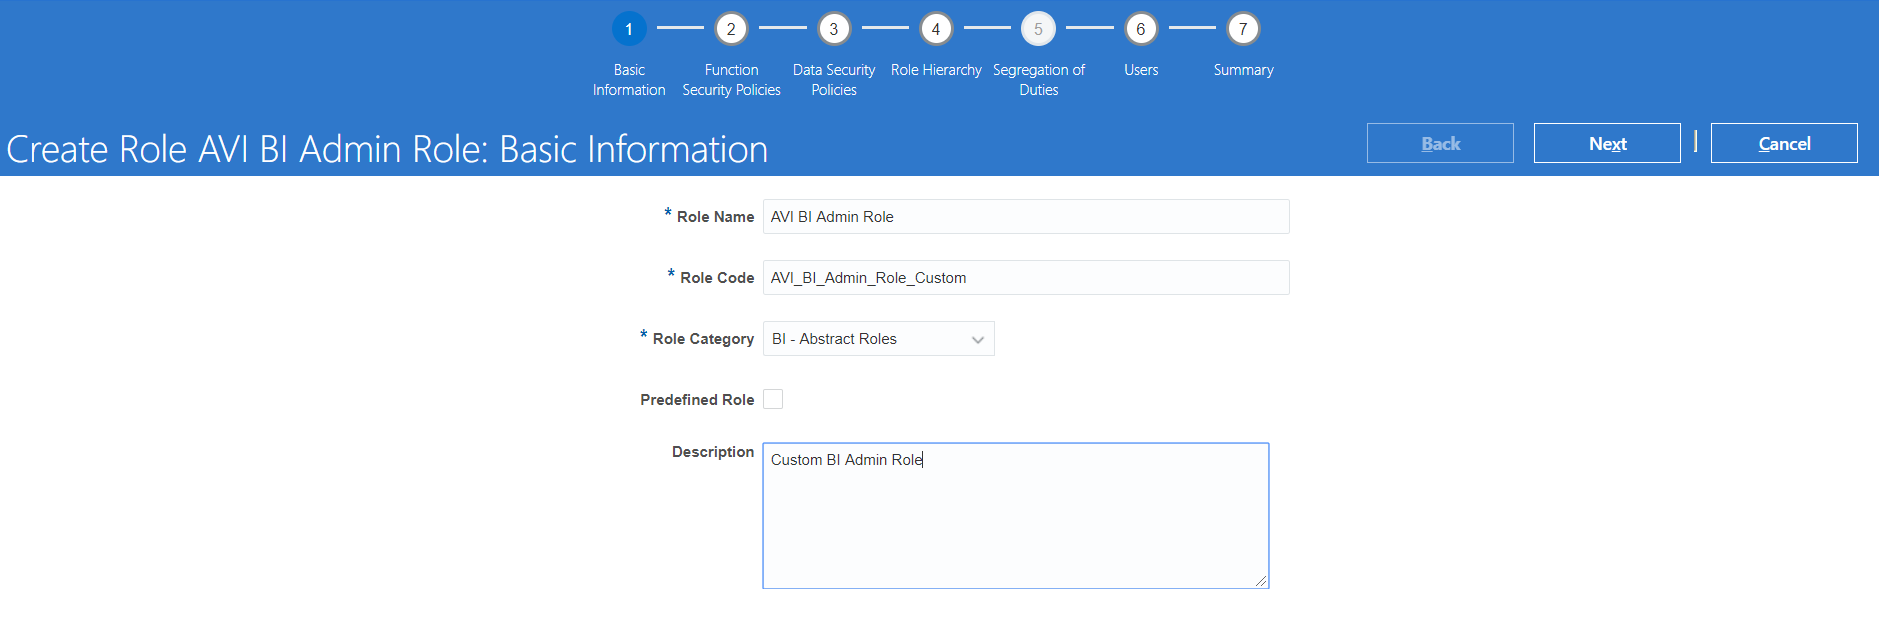
Navigate to Tool » Security Console » and then click on Create Role button. You need to have IT Security Manager role, in order to be able to create custom role. When you are on “Create Role : Basic Information” page, enter details as follows.

- *Role Name : AVI BI Admin Role
- *Role Code : AVI_BI_Admin_Role_Custom
- *Role Category : BI – Abstract Roles
- Predefined Role : <Leave unchecked>
- Description : Custom BI Admin Role
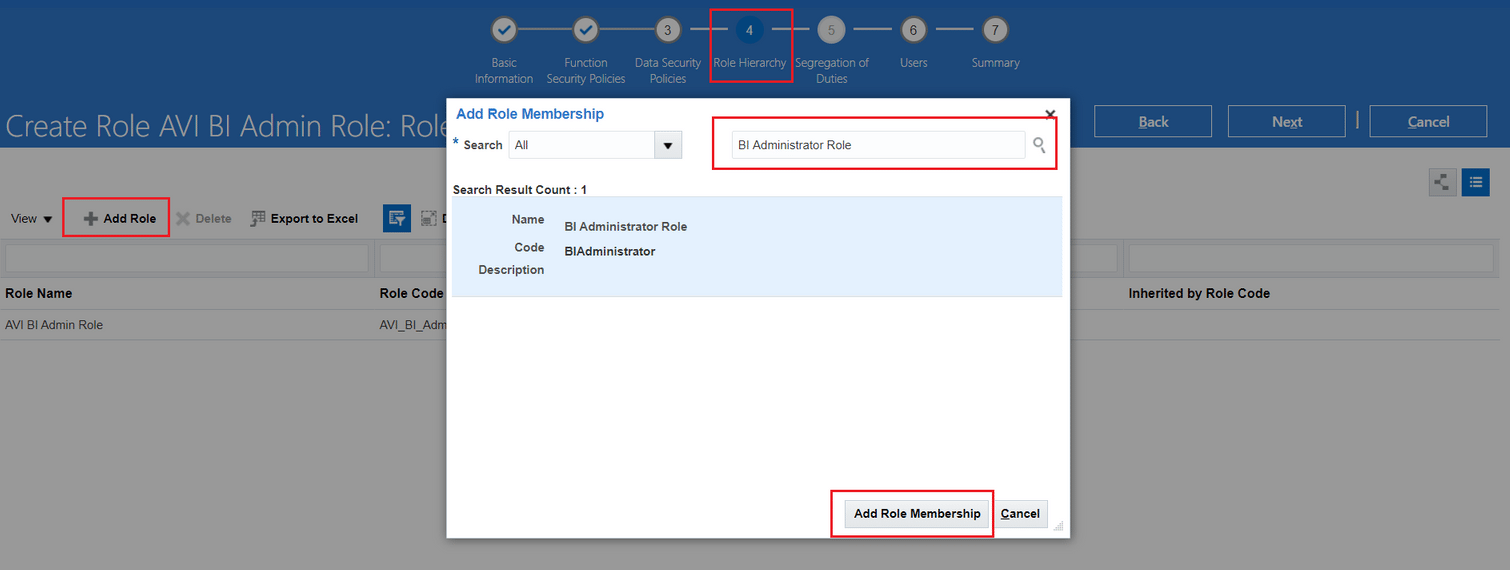
Once you enter all these details click on the Role Hierarchy train stop. On this screen, click on + Add Role button and search for “BI Administrator Role“. Once you get it, highlight it and then click on button “Add Role Membership“. Refer below screenshot.
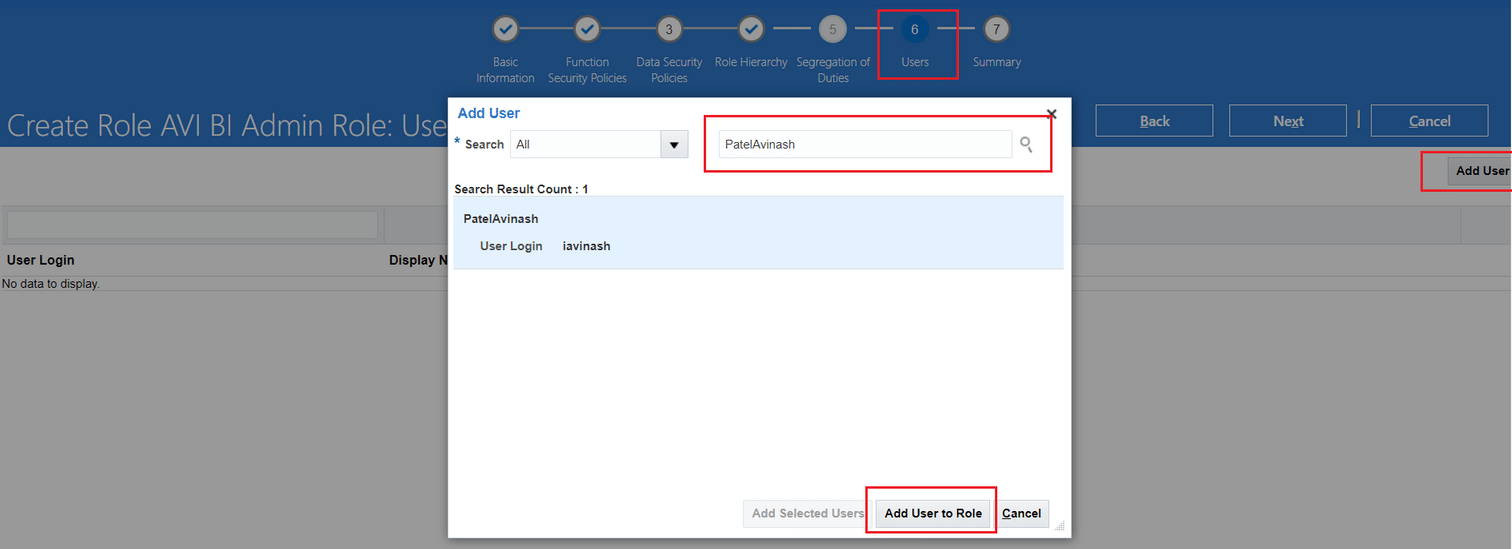
Once you do that, click on Users train stop. Click on “Add User” button and search for user you want to assign this custom BI Administrator role, who will be able to create custom reports.
Once done, click on next, you will see Submit button. Click on that. Now you have successfully created a custom BI Administrator role and assigned to the user. Now login through that user to create custom report.
3. Business Requirement to create OTBI report.
Before we proceed further and learn how to create OTBI report, lets first understand what is the business requirement. Our requirement is to crate a Probation Expiry Report for HR so that they can check in advance whose probation is going to end in next 30 days. Based on the report, HR can take input from manager and decide whether to extend the probation or confirm the employee. Probation Expiry Report should fetch following information for HRs.
- Person Number
- Employee Name
- Manager Name
- Hire Date
- Probation End Date
- Business Unit Name
- Department Name
- Job Name
4. Steps to Create Custom OTBI Reports
Lets start, to create Probation Expiry OTBI report navigate to Tools » Reports and Analytics. You will see a screen like this.

You can create OTBI report directly by clicking on Create » Analysis or You can also click on the Browse Catalog button, appearing on the screen above. This will take you to OTBI page as shown below (for this article we will follow Browse Catalog navigation)
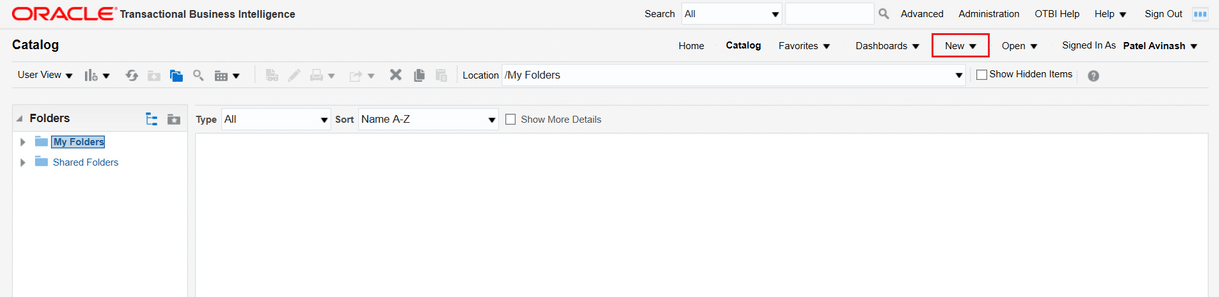
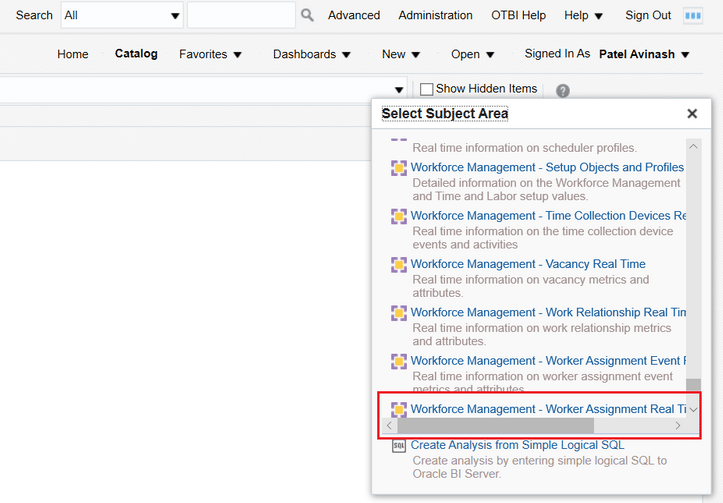
On this screen click on New and then select Analysis. As soon as you click on the Analysis system will ask you to select subject area as shown below in the image. Subject area is the logical grouping or related table. Since we are working on workers assignment details, we have to select “Workforce Management – Worker Assignment Real Time“. With experience you will come to know which subject area to use for the data you want to report. For now scroll below and you will find subject area “Workforce Management – Worker Assignment Real Time“. Click on that.
Once you click on the subject area, your screen will look like this.
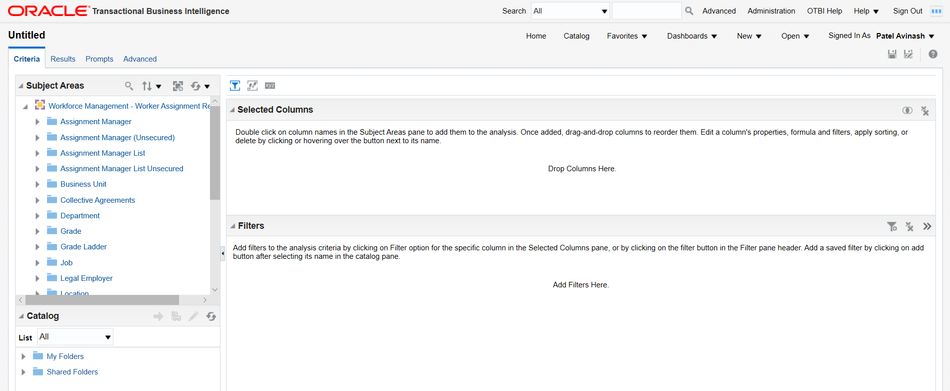
Now we have to search columns from the subject area section, drag that and drop at Selected Columns area. You can also double click on the column to move it to selected columns area.
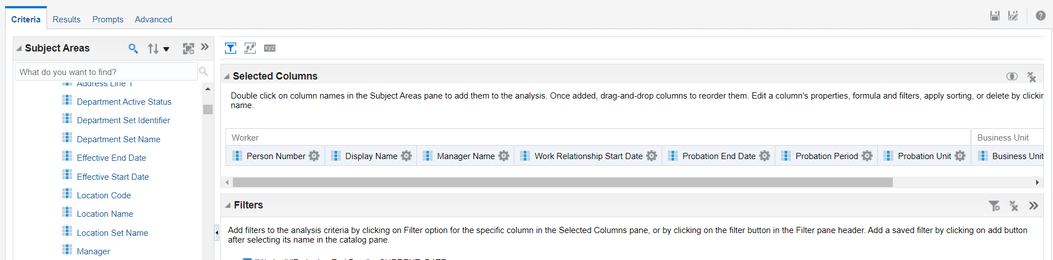
Move or double click following columns under “Worker” folder
Worker
– Person Number
– Display Name
– Manager Name
– Work Relationship Start Date
– Probation End Date
– Probation Period
– Probation Unit
Similarly add columns as shown below from different folders
Business Unit
– Business Unit Name
Department
– Name
Job
– Name
If you have followed all these steps correctly, your screen will look like this.
Now, click on the save analysis button (floppy disk icon), which is available at upper right corner under your user name. As soon as you click on that system will ask you to give report name and the place you would like to save the report.
It is a best practice to save report under the folder Shared Folder » Custom » And then select folder related to the report. We are going to select “Human Capital Management” as shown in the image below. Also give the report name under the name filed and then click on OK. Report name here is “Workers Probation Expiry Report”
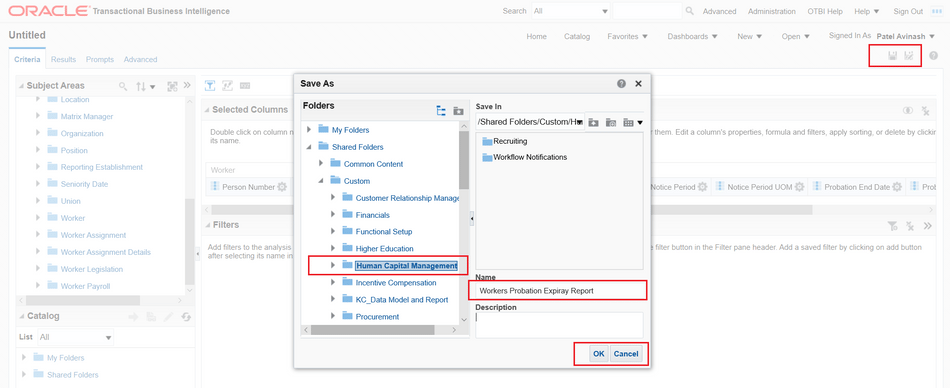
This step will save the report and also give access to others to run this report. If you do not want others to see this report, save the report under folder My Folder.
4.1. Now it is time to run Probation Expiry Report
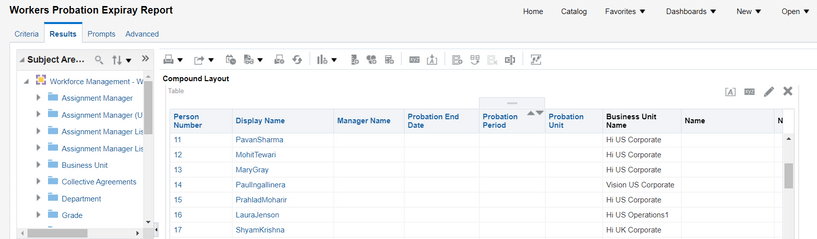
Now to run the report, click on the tab “Results“, which is available just beside criteria tab. On this screen you will see result of the report. If you are seeing the results Congrats!! you have done a great job. You can move to section “4.1.1. Customize Probation Expiry Report Further“. But if you are not seeing any result but getting below message “No Result“, dont worry, this is normal.
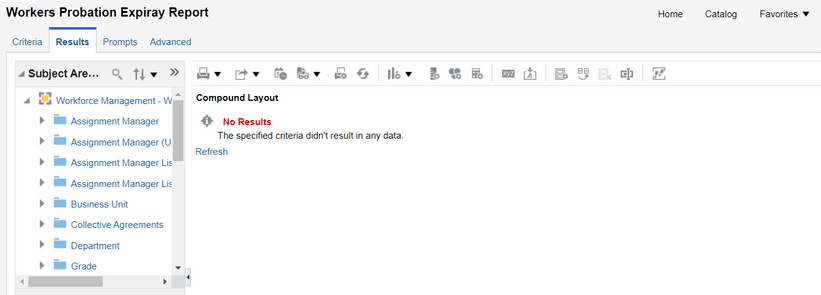
This is because, you have access/role to create report but you do not have access to see the data. Subject areas are functionally secured using duty roles. Please refer the table below to see what kind of role you will have to assign additionally to see report output.
| HCM Job Role You Need to Have | Oracle Fusion Transactional Business Intelligence Folders |
| Human Resource Analyst | Business Intelligence Publisher (BIP) Goals, BIP Performance, BIP Profiles, OTBI Career, and OTBI Workforce Management folders |
| Benefits Manager | OTBI Benefits |
| Compensation Manager | OTBI Compensation |
| Payroll Manager | OTBI and OBIA Payroll folders |
| Line Manager | BIP Compensation, BIP Workforce Management, OTBI Workforce Management, and many OBIA folders |
You can read Learn Oracle Fusion role concept with examples to know more about oracle roles.
4.1.1. Customize Probation Expiry Report Further
Now we assume you have assigned necessary roles to your account and you are able to see the report output.
Our work is not done yet. This report will fetch all employees but our requirement is to fetch only those employees whose probation is ending in next 30 days, so that HR can review their record and take action. HR can either extend their probation or confirm their probation.
To amend the report to fetch only desired employees. Go back to Criteria tab and then move your cursor over gear icon appearing beside column Probation End Date. Now click on the Filter icon.
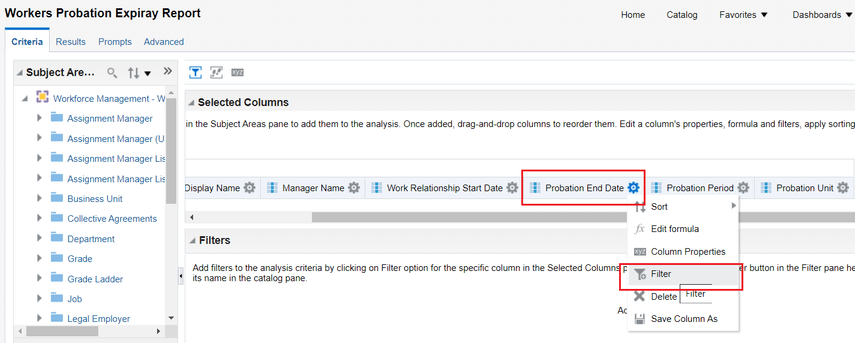
Now you will see a pop up screen “New Filter” as shown in the image below. On this screen, click on check box “Convert this filter to SQL” and click OK button.
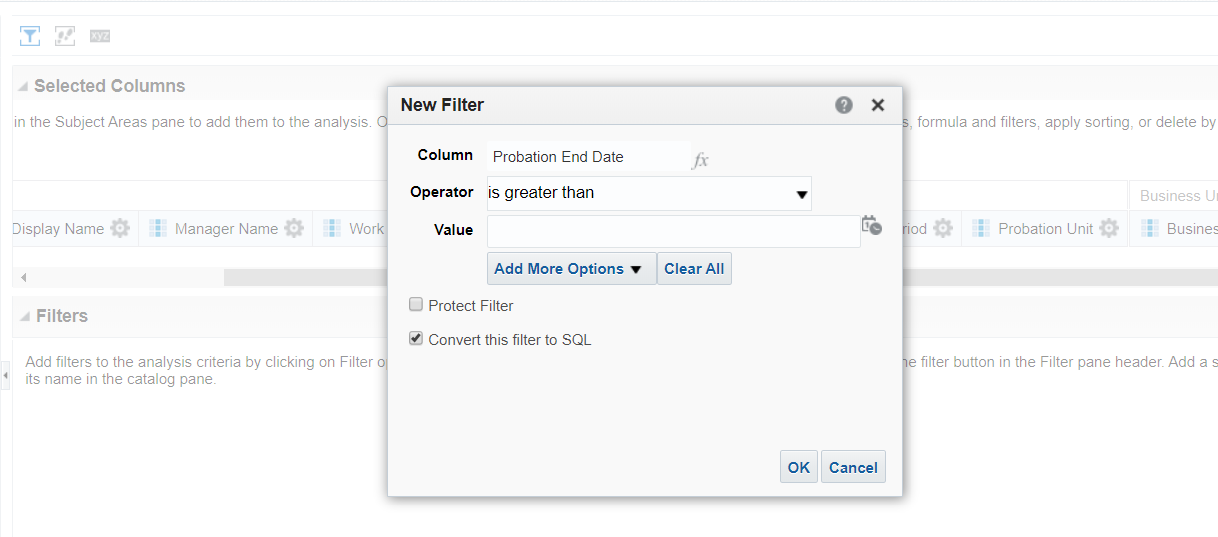
Once you click on OK a new screen will pop up. On this screen manually type CURRENT_DATE so that equation would look like this “Worker”.”Probation End Date” > CURRENT_DATE
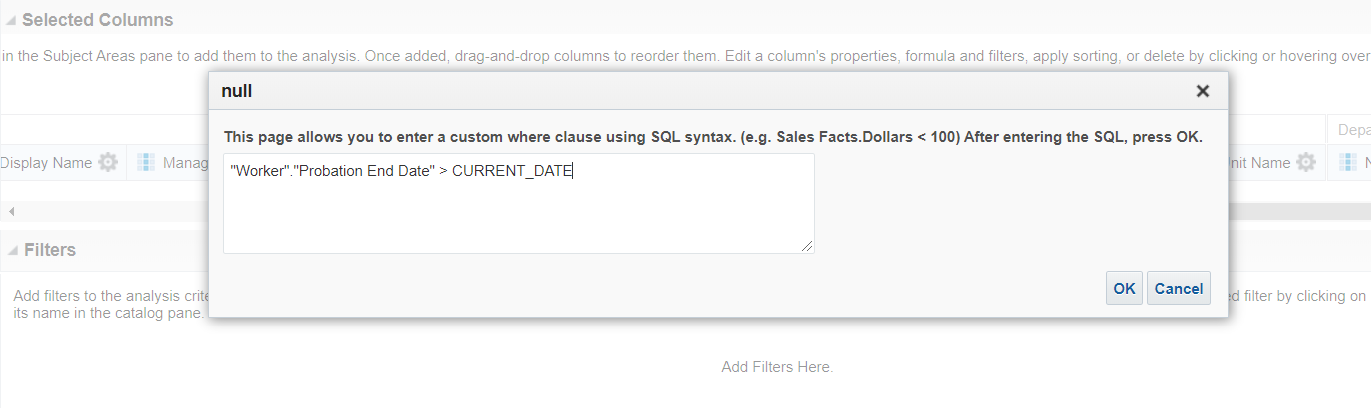
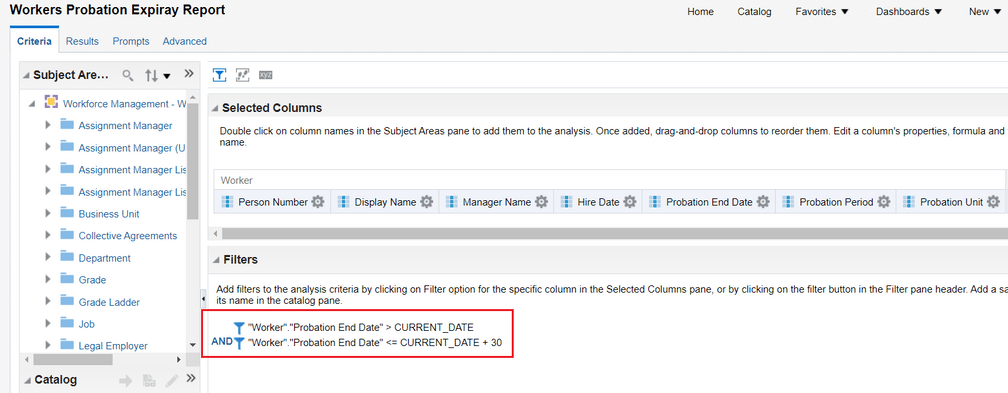
Click on OK to add the filter. Now repeat above steps again to add another expression like “Worker”.”Probation End Date” <= CURRENT_DATE + 30 your final filter should look like this.
Now go to the Results tab to run the report again. Now you will only see selected employees as per the filter.
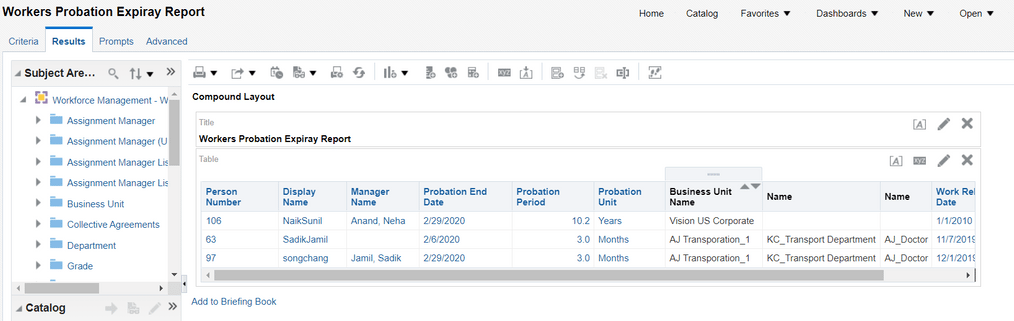
Don’t forget to click on save button frequently to save your work. Now we can see that report is pulling only those employees whose probation is expiring in next 30 days. We are almost done but want to make sure report looks slightly better. If you see Department and Job both columns have same name Name. We need to change it to Department Name and Job Name respectively.
To do this, go back to Criteria tab again and move your mouse over column pertaining to department and click on gear icon. And select option Column Properties. Click on Column Format tab. Click on checkbox Custom Headings. Now change the Column Heading to “Department Name“, as shown below.
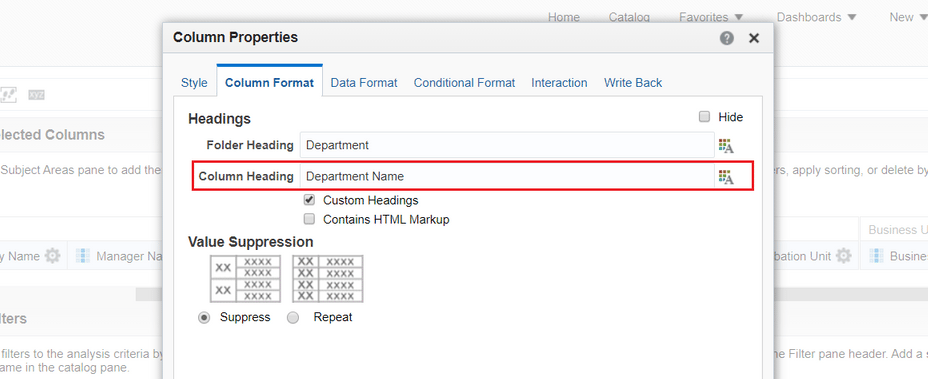
Similarly, change the column heading for Job and also change the column heading from “Work Relationship Start Date” to “Hire Date”. Now run the report again and you can see new column names.
5. How to Export and Import OTBI Report.
Once you have prepared your OTBI report, there is no need to prepare the same again in new instance. You can just export the report from your no-prod instance and then import the same in production.
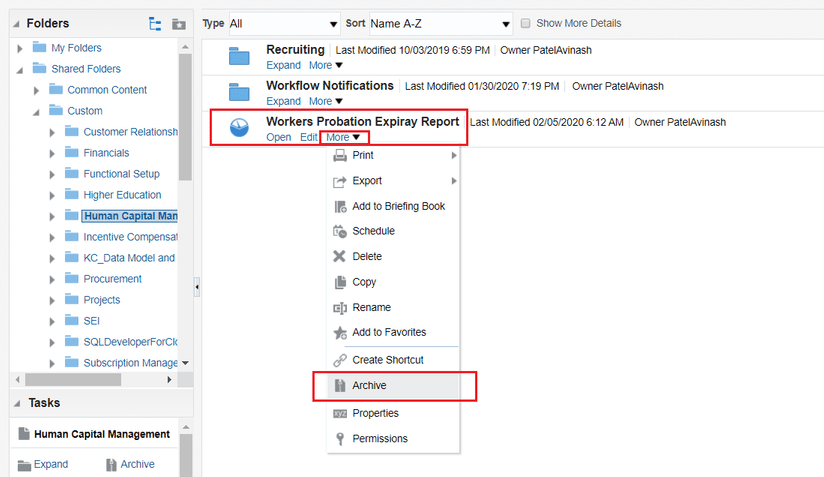
To export the the report, click on the Catalog menu available beside Home menu. Most likely you will see your report on that screen but if you are not seeing your report, just navigate to the folder you had saved your report.
Once you recognize the report, click on more and then click on archive and click on OK. This will save the file on your local PC/Laptop.
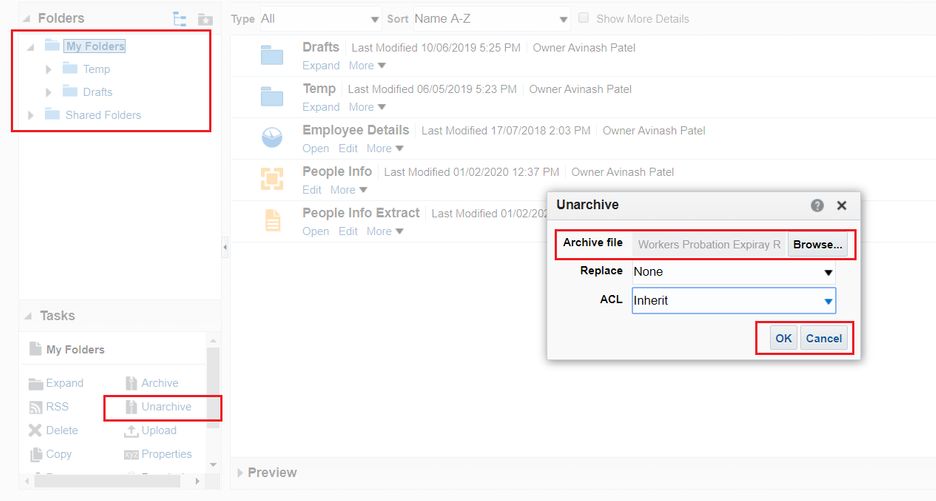
Now to import the report in new instance/POD Just navigate to Tools » Reports and Analytics » Browse Catalog » and navigate to the folder you want to save your record.
6. Bonus Tips
- If you want to directly open to OTBI, also known as BI Answers, just suffix analytics at the end of the of the main url of your application. For example, if you application url is https://fa-abc-iavinash.oraclecloud.com you need to access OTBI as follows https://fa-abc-iavinash.oraclecloud.com/analytics
- By default any DFF you configure is not available inside OTBI directly, to make it appear you need to run a process called “Import Oracle Fusion Data Extensions for Transactional Business Intelligence“.

No comments:
Post a Comment